Lacy showed you her favorite beauty picks, and I, of course, wanted to tag along. I'm showing you my makeup routine! This is pretty much what I do with my face on a daily basis. I like a pretty light coverage, partly because I don't like not being able to touch my face or my eyes throughout the day. But more importantly, I'm pretty lazy in the makeup department. I mean, don't get me wrong; I definitely get into those makeup moods where I mess around for an hour trying on different eyeliners, shadows, and lipsticks. But on a daily basis, I want something easy and light. Plus, on the days when I do the full thing - the concealer, foundation, eyeliner, mascara, eye shadow, blush, lipstick... - I usually just end up feeling like I look like a 10 year old who just got permission to play in her mother's makeup bag for the first time.
So here goes!
There's the line up. I can apply all these products in about five minutes or less, which is basically my ideal way to go with makeup. A quick getting-ready routine means I have more time to make my breakfast and lunch, and maybe even get some reading time in.
Firstly, concealer.
I used to use a concealer stick that is so old that any kind of branding on the package has completely worn off. Which obviously means that I didn't use it that often. This bottle of Almay smart shade concealer in light/pale probably won't last me as long because I've begun to use it daily! I picked this up after getting a Target coupon for $4 off. Otherwise, I'd never pick up something I'd consider so pricey (It's only $7.50, I'm just a cheapskate.) I only need a tiny dot of product (see photo above) to cover any and all blemishes. The product blends in flawlessly, and I can't even feel it on my skin. And the coverage is excellent! I'm in love.
Next up, foundation.
But... not really foundation. I can't handle heavy things on my skin, so tinted moisturizer is basically heaven for me. I use a small dot of L'Oreal BB Cream with a half pump of L'Oreal Magic Lumi Primer, mix it a bit with my fingertips, and smooth it all over my face, concentrating mostly across my cheeks and T-zone. The Lumi primer gives a faint but really pretty shimmer, and the BB cream gives a smooth finish. I used to just quickly tap my face with powder, but this takes basically the same amount of time with a much longer-lasting and prettier coverage.
Once the overall face is taken care of, I focus on eyes.
I'm a black liner and mascara kind of girl. I've tried brown before, and I always feel like it doesn't pop enough and fades quickly (although, the fading thing could have more to do with the cheap liners I'm using.) I love the Sephora nano eyeliner. It goes on smoothly and doesn't fade off throughout the day. I just line the outer corners of my eyes on both top and bottom. I'm not sure when I started doing this, or why, but it's become a bit of a habit now. This method means that I don't end up with liner in my creases by the middle of the day. Win.
For mascara, I've used the classic green-and-pink-tube Covergirl mascara for as long as I've been wearing makeup. However, I got roped into a Mary Kay party, and won a tube of their Lash Love mascara. And I've kind of fallen head over heels for it. This sample tube is nearly gone, and I need to locate a new tube asap. The mascara goes on thick without being clumpy, separates my eyelashes beautifully, and wears well throughout the day. My only complaint is that, by the end of the day, I have noticed a bit of flaking. It also doesn't wash off quite as well as my Covergirl standby. Those complaints are pretty minor, though. In the below photo, you may notice that I only have mascara on my top lashes. This is another thing I do because I'm a bit lazy. But I also think that it gives my eyes a more open look. And bonus, I don't end up with black smears under my eyes when I start to get tired at the end of the day!
Once the eyes are done, it's time for a bit of blush.
I scheduled a Nordstrom counter make-up date with my Little Sister Ariel, and of course, they tell you you have to spend $50 in makeup when that's done. This NARS 'The Multiple' stick was one of the things they used on me, and I ended up loving, so it was a bit of a splurge. This shade is Portofino. I use it strictly for my cheeks, but it can be used as shadow and lipstick as well. It has a nice soft shimmer that I really like. I put a few dabs onto my cheekbones, and use my fingers to smudge/smooth it out.
And that's it! My typical beauty routine. The whole thing will take you less time to do than it has taken you to read this post (sorry about that...) I tend to shop the cheap makeup aisles (E.L.F., N.Y.C., and Wet n' Wild, anyone?), but in writing this post, I've discovered that all my actual favorites are... not those brands. So, it turns out it quality is better than a cheap price tag in the long run. Who knew?
Here's the finished look:
I just smear on one of about a million lipsticks, balms, or glosses I have floating around my purse and house; whichever one I'm in the mood for that day. Pretty much any color works with this minimalist look! The one I've got on above is Fiore by Borghese (a sample I got through a Beauty Bar subscription nearly two years ago.) It's much darker in person than it is in that link picture, by the way. And it's super long lasting and a great natural color, but, warning, also a bit sticky.
Done! Now it's your turn. Share your beauty favorites or beauty routine! Even if I'm not a huge makeup person, I still love to read other people's routines. Weird.
Saturday, May 24, 2014
Wednesday, May 14, 2014
New Makeup Favorites
Hello! I know our blog has been dying a slow tragic death. But I'm reviving it because...I want to talk about makeup. Cool?
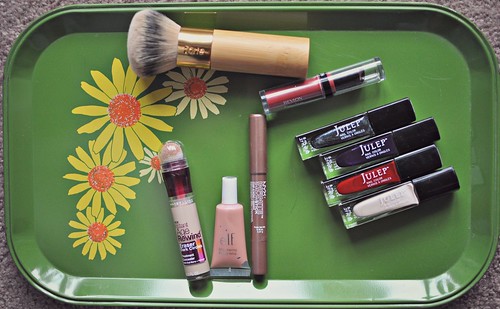
I weirdly love watching makeup vloggers and lusting over all the pretty things at Sephora. However, my makeup budget puts me squarely in Ulta land. (The cheap side, guys. Not the fancy side.) So the good news is that any makeup stuff I post is likely going to be quite affordable. The bad news is that I'll never be able to do a Sephora haul post. So...sorry if that was what you were hoping for.
On to the things!
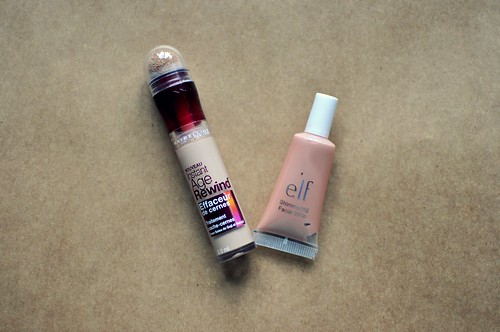
I haven't ventured too far into the world of undereye concealer, but I decided to try out the Maybelline Instant Age Rewind after Essiebutton recommended it. (She's one of the aforementioned beauty vloggers I really enjoy.) This stuff goes on really creamy and doesn't dry or cake throughout the day. They sell a version of this specifically for spot coverage too. But in the interest of full disclosure, I'll tell you that I use this for both and it does the job. Done and done.
(If you're in the market for a fancier undereye concealer, I got a sample of Benefit's Fakeup in a Birchbox and it was great! I feel like it gave a bit more coverage than the Maybelline.)
I picked up this Elf Shimmering Facial Whip on a whim one day. Crap, it's pretty. I use it on my cheekbones and it's so shimmery and glowy and it only costs a DOLLAR. Just...buy it. You can't lose. (I've heard this is a pretty good dupe for Benefit's High Beam, but having not tried that, I can't say for sure)
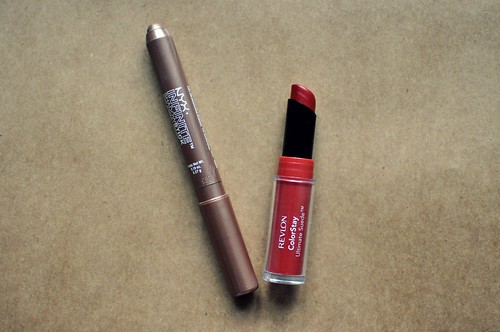
I am really loving NYX products lately. Their lipglosses and blush are great and I'm intrigued by their lipsticks and eyeliners. I'll try to keep you posted on developments in that area. But! All I need in my life right now is this Infinite Shadow Stick. I have maybe the world's most oily eyelids, so if I don't use a primer (a good one) my eyeshadow is MIA by 10 am. (Well, it's not really missing. It has all relocated to my crease.) I'm generally too lazy/late in the morning to bother with primer and eyeshadow so I just stick to eyeliner. Enter the shadow stick. I draw this thing on my eyelid in the morning and it does NOT budge. Is it a miracle of science? Black magic? I don't know or care. I just know I want more of them.
Speaking of not budging, the Revlon Colorstay Ultimate Suede lipstick is another wonder product. This stuff lasts all day. I have seriously had to scrub it off before bed. It's some kind of lipstick/stain hybrid but it doesn't settle into my lip creases or feather out at the edges. If you're a lipstick wearer, seriously give this a try. It will change your life.
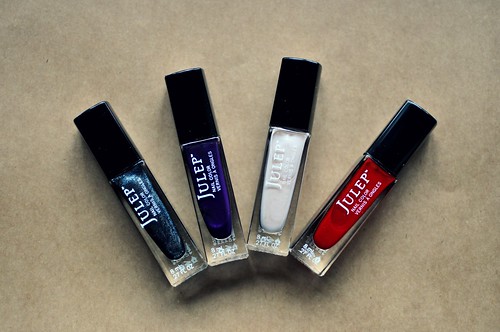
Julep! How loudly can I sing your praises? This is my favorite nail polish ever EVER. The formula goes on perfectly and it lasts seemingly forever. The downside is that it costs more than OPI and you get about half the amount of product. If you're cool spending 20 bucks a month on nail polish (the first month is free!) consider subscribing to Julep. And maybe invite me over to do manicures sometime....
I have saved my very very favorite for last. I have been lusting over the Tarte Foundation Brush and Amazonian Clay Foundation for a while, and Brian got them for me as a Mother's Day present! (are you allowed to celebrate that holiday if your baby just hangs out in your uterus all day? ....should I not say uterus on this blog?)
Moving on. Gah. This brush is so pretty and makes your foundation look flawless. I will say that if you're not into full coverage foundation, the Amazonian Clay probably isn't for you. I totally am though, and I love how it covers my scary pregnancy acne and keeps my skin tone even all the day long. (The first day I used it, I was checking it every couple hours and kept exclaiming to Brian, "my skin still looks so good!"). These items are obviously a bit higher of a price point than my normal makeup, but I do feel like they're a good investment if you want a nice foundation and/or brush. Also, based on how long I've been using just the tiny sample of foundation I got originally from Sephora, the full size is going to last me foreeeever.
This has been Lacy going on forever about makeup. Over and out!
Saturday, October 5, 2013
Gingerbread Banana Granola Muffins
I should definitely be posting a recipe that's a bit more autumn-like. I have, after all, made pumpkin donuts and cranberry-orange donuts, which are both fall to winter inspired flavors (I just got a donut pan! So I'm going a bit crazy with that.) Autumn is also my favorite time of the year. I nearly cried of happiness the other day, simply walking down the street seeing pumpkins and crisp leaves and feeling the bite of cool air on my cheeks. As I said on Instagram, autumn is the real most wonderful time of the year.
But gingerbread is kind of wintery, so let's just pretend I'm ahead of the curve here. This recipe was a creation born out of the fact that I was actually craving the delicious looking sweet potato granola muffins over on Baker by Nature. However, the wilting bananas on our little produce shelf were demanding use! I was going to just do a straight change out of banana mush to sweet potato mush in her recipe, but... I can never leave well enough alone. So I found Framed Cooks gingerbread muffin recipe, and based the rest off that.
These babies are fluffy and not overly sweet. The granola gives the muffins a nice textural element, which I cannot live without. I had the leftovers of a batch of banana granola which was a nice boost of banana flavor as well. However, feel free to use whatever kind of granola you have lying around or find in the store. Or throw in a handful of nuts or oats! Or go completely without. This recipe likes to be mixed up to your preferences.
Oh, and I skipped the browned butter step. Not really because I'm lazy, but moreso because I find that putting browned butter into baked goods kind of masks it's incredible flavor. Unless you're using it as a finisher or in a glaze, I can't really see the point of muting the flavor within your baked good. That stuff needs to shine! But. Maybe you feel differently. Brown your butter if you'd like!
Gingerbread Banana Granola Muffins
Yields 12+ Muffins
2 1/3 c. all purpose flour
2 tsp. baking powder
1 tsp. baking soda
1 tsp. ground ginger
1/2 tsp. cinnamon
1/2 tsp. allspice
1/4 tsp. cloves
1/4 tsp. salt
3 Tbs. butter, room temperature
1/2 c. sugar
1/4 c. brown sugar
1 c. mashed banana
1/3 c. molasses, full flavored
2 eggs
1/2 c. buttermilk*
3/4 c.+ granola
Preheat oven to 350 degrees. Spray a 12-cup muffin tin with non-stick spray. I also have a 12-cup mini muffin tin, and had enough batter to fill up both.
Measure the flour, baking powder, baking soda, spices, and salt into a medium measuring bowl. Mix with a fork or whisk to combine.
In another measuring bowl, cream together the butter and sugars. Add in the mashed banana, and mix thoroughly. Stir in the molasses, then the eggs, one at a time. Lastly, add the buttermilk, mixing all until fully combined. Pour a third of this banana mixture into the dry ingredients, mixing with a fork until soaked into the flour. Add another third and mix, and the last third, mixing until the batter is smooth and no flour streaks remain. Try not to overmix. Pour the granola into the batter, and use a rubber spatula to mix the granola in fully.
Spoon the batter into your prepared muffin tins. Sprinkle a little extra granola on the tops if you'd like! Put them in the oven, and cook until the tops bounce back when poked and a toothpick comes out clean, about 25 minutes (or around 15 for the mini muffins.)
*A few tricks if you don't have buttermilk. Put 1 Tbs. plain yogurt in a measuring cup, and fill it the rest of the way with regular milk. Mix with a fork, and there's your buttermilk! You can also mix a bit of milk and lemon juice (maybe a couple teaspoons) and let that sit for 10 minutes or so to sour. Or just use regular milk. It won't kill your muffins.
Friday, September 13, 2013
Friday Favorites
Happy Friday the 13th, and welcome back to Friday Favorites! We took quite the hiatus, but both of us are bored at work, counting down the minutes to our vinyl record party tonight. (We're cool like that.) Ready to be regaled with the things we love? I'll kick it off!
I don't always love the blog I Believe In Unicorns, but the girl knows how to rock hippie-chic. More importantly, I'm dying over her current hair. I might be requesting bleached-blonde ends soon enough...
My current no sugar fast has not been as hard as expected. Perhaps because I kicked it off the evening before with a version of this hot chocolate affogato situation? So. Good.
This farm-style picnic table is so pretty. I don't know if I'll ever have a kitchen/dining room that will deem something like this appropriate, but I sure hope so. Beautiful, practical, and vintage-esque.
Lacy's not on board with this brie, bacon, and fig jam grilled cheese, but I sure would eat it every single day.
And speaking of bacon... Ruth Reichl's idea for bacon cheese toasts makes me want to facepalm that I didn't think of it before. So simple. So indulgent. Maybe I'll make it for a brunch-like meal tomorrow morning. Along with some leftover peach hand pies.
........
happiest of fridays! this week has gone by quickly, but this day is going by slooooowly. man alive.
anyway, lacy here, with my favorite things this week! (pretend i said that in an Oprah voice. thanks)
it's been raining a bit this week and it makes me so happy. even though my moccasins got soaked on my lunch run today. (they're currently trying to dry out under my desk. it's not going great). i've been editing my pinterest boards and realized the overwhelming majority of my wear board is fall clothes. it's no wonder i have such a hard time getting dressed in the summer.. the point of all this text was...i like this outfit. and i'm excited for fall dressing.
i never thought i'd be someone who is obsessed with kitchens. but the thing i'm most excited about when we buy a house someday is getting to pick out a kitchen. the backsplash and lighting in here is just perfect.
i'm really intrigued with the idea of veggie chips lately. these baked rosemary and basil zucchini chips are at the top of my list to try.
i realized i like to decorate by room. the bathroom is basically done, so now i'm setting my sights on the bedroom. i love the idea of these super simple prints as a headboard fill in. because maybe our current bed used to be part of a bunk bed and doesn't have one....
brian and i started a rewatch of the office a while ago. the third season is so amazing! seriously, it makes me a bit sad how disinterested i was in the last seasons. (i know this isn't from season three. but i still love it)
and this. because i find it super hilarious.
have a great weekend! go and do something spooky.
...or don't! i would much rather watch the office and eat some cookies myself.
Peach Hand Pies
My friend and I somehow decided it was a good idea to do No Sugar September. So here I am, putting fruit in my dessert.
But listen, we're not a pair of crazies who are cutting out ev.er.y.thing. with sugar. No, no. I'm still eating cereals and the occasional honey soaked item. The point is to not overdo it on cookies and candy and cakes and chocolate. It's been four days, and I'm making it!
My same no-sugar friend also gifted me with a large bag of fresh picked peaches. Thus the peach filling! But you can use whatever you have on hand. We're coming up on apple season, and these pies would be kiiiiller stuffed full with cinnamon apples. Do that too! I think I will.
So these hand pies are not completely devoid of sugar. But there's so little of it in there that it counts in our books! It should count in your book, too. And by me saying there's very little sugar, do not mistake me in thinking I mean these are healthy. Pie crust drowns in shortening. I mean, that's what makes it so beautifully flaky. Who says indulgences ought to be sweet?
These are rustic looking! Which is just another way to say that I am no pastry perfectionist. Sometimes the filling leaks out. Sometimes the sides don't get as sealed as they should. That makes the pictures a little less than pretty, but who cares about photos when the taste is this good? Rustic also gives you permission to make mistakes. My kind of pastry.
Also, I put a touch of jam into the peach and sugar mix. Partly because it's the best jam I've ever had and I want to put it into everything. And partly because it adds a touch of sweetness without being pure sugar. We're bending the sugar rules. And if you're wondering, it's LuAnn's raspberry rhubarb jam that the Husband and I picked up in a tiny gorgeous town called Midway on our first anniversary. LuAnn's jams will blow your mind.
Peach Hand Pies
Yields about 12 pies
You'll need two pie crusts. You can purchase pie dough (if it comes frozen in tins, let the dough thaw, then flip it out of the tin to flatten and score/fill accordingly), or make it. This is my favorite recipe, taught to me by my mom. Follow that recipe up to the point that you wrap the dough and refrigerate it.
Pie Filling:
3-4 peaches
1 Tbs. brown sugar
1 Tbs. honey
1 tsp. cinnamon (or to taste)
1 1/2 tsp. jam, optional
1/4 tsp. salt
Rinse peaches and remove any loose skin. Dice into small chunks, about 1/4 to 1/2 inch. Add sugar, honey, cinnamon, jam, and salt to peaches, and mix lightly to coat the peaches. Taste and adjust any flavors accordingly. (This is where you add extra sugar if you're not needing low sugar.) If mixture is runny, lightly sprinkle (and I mean lightly!) with corn starch to thicken. You can place in the fridge for a few hours, if needed
(Photo Break)
To Assemble:
Preheat oven to 375 degrees.
Take dough out of fridge, and roll out on well-floured surface to 1/4 inch thickness or so, lifting dough occasionally to be sure it isn't sticking (add extra flour underneath, if necessary). Score the dough into approximately 3"x 6" pieces--this doesn't need to be exact. (If you're looking at my photos above, I cut the longer pieces in half to be about equal to the piece that has fruit spooned on it already.)
Spoon the filling onto one end of the dough. You can do about a tablespoon of filling, depending on the size of the dough you cut. Fold the opposite end of the dough over the filling, and press to seal the dough, taking care to not let filling leak out. (If the top cracks, that's okay; just try to press it together again. But you'll need holes in the top for steam to leak out anyway, so it's not a big deal!)
Use a fork to score the sides closed and pierce the top once or twice for steam vents. Place finished pie on a parchment-lined or greased baking sheet. Continue process for five more pies, six total.
Brush pies with an egg wash (1 egg beaten well with 1 Tbs. water). Place the sheet in the oven and bake for 15-20 minutes, until crust is golden.
While those six pies are baking, assemble your other six. At this point in the process (post fork-scoring, pre-egg wash), you can freeze the pies for future baking if you'd like!
These are perfect for breakfast because they're not too sweet! In fact, it's what I ate this morning.
Monday, September 9, 2013
wishlist - september
i'm alive! after an unplanned summer break (i got real caught up in packing and moving and unpacking and...being married? i don't know) i'm back.
and with a september wishlist to get back in the game!
1. i had a (muuuch cheaper) target version of these shoes. and i loved them. i could wear them without falling down and they actually looked cute with tights. and then they broke. like jerks! i can't imagine i'll pay for this particular pair, but if i find a more affordable version, they're going right into my cart.
2. the entire blogosphere is ready to start dressing for fall and i'm going to jump off that bridge with them. wearing a button up shirt under a puffy vest is something that has never before occured to me....and i'm super on board. the only caveat is that i'm under a self-imposed clothes shopping ban until 2014. gross. why did i do that?
3. it's still 90 degrees outside, but i want to eat soup and paninis for every meal. thusly, i should definitely own a panini press.
4. i bought some Russian nesting doll (matroyshka) measuring cups and i am infatuated with them. so much so that i now want to start collecting real ones.
5. this jacket. it's all i want in a fall jacket. it's all i want in life. someone please buy it and let me admire you in it.
6. ignore the lame shirt and focus solely on those awesome sweat pants. i'm hoping i can get similar results with a sharpie marker and some existing lounge pants... i'll keep you posted.
7. this print speaks the truth. and needs to be in my kitchen.
Thursday, September 5, 2013
Chorizo and Potato Chili
Husband makes what he calls 'sexy fries'. Really, they're just french fries. But he's pretty passionate about getting the right levels of oil, and julienne-ing the potatoes perfectly, and spicing them up just right. He really is good at it, too! We had a family trip to Mesquite, and he was assigned fry duty for eight adults and two kids. Sooooo much frying.
That being said, we ended up with leftover potatoes. My idea was to fry them up, too, but oh yeah, we were on vacation and couldn't be bothered to stand over the stove top for more than one evening. I'll hang out by the pool, thank you very much.
Anyway, back from vacation, I needed to do something with the potatoes. And the black beans, farmers market tomato, and cilantro languishing in the fridge. And so! Chili was on my mind. The drive home from work gave me ample time to realize that a chili with cilantro and black beans should be Mexican, and a Mexican chili must have chorizo. Spicy, bright orange chorizo. It was the first thing I grabbed in the grocery store.
And here's an interesting little trick. When you're making a Mexican soup or chili, it's a good idea to chop up a corn tortilla or two to mix into the liquid. The tortillas thicken things up just a little, and give off the faintest corn taste. It's lovely!
This chili is filling and spicy and a perfect meal for the cooler evenings that are soon to start. Make sure you top it like crazy. Toppings are my favorite part of soups and chilis. And apparently, all the best Mexican toppings are green... avocadoes, and limes, and green onions, and cilantro. Ohhhhh myyyy.
Chorizo and Potato Chili
Serves 4-6
3 small potatoes, or 1 to 2 large ones
1/2 large onion
1 green bell pepper
2 cloves garlic
1 Tbs. chili powder
1 tsp. cumin
1/2 tsp. smoked paprika
1/2 tsp. oregano
1 can Rotel diced tomato & green chilies
1 large tomato, diced
1/2 c. water
-or sub 1 can diced tomatoes for tomato & water
1 1/2 c. cooked black beans (or 1 can)
1 Tbs. ketchup
1 corn tortilla
salt and pepper
olive oil
Heat a very deep skillet, or soup pot, over medium heat. Add chorizo, and allow to cook, occasionally stirring and breaking into pieces with a spatula, for about 7-8 minutes. In the meantime, chop the potatoes, onion, and pepper into a 1/4 to 1/2 inch dice (I like a chunky chili and go with 1/2 inch).
Once cooked, remove chorizo with a slotted spoon and set aside. You should have some chorizo grease in the pan. Add some oil, if necessary, to have a tablespoon or two of fat in the pan. Add in the chopped potatoes, onion, and pepper, and season with salt and pepper. Saute for 5 minutes or so until the onions begin to be translucent. Add the garlic, chili powder, cumin, paprika, and oregano, and stir well to coat the veggies in all the spices. Cook for about a minute.
To the pot of veggies, add in the chorizo, diced tomatoes plus the extra tomato and water (or another can of tomatoes), and black beans. Stir well, and turn heat down to a simmer. Add the ketchup, and season with a little extra salt and pepper. Cover with a lid, and allow to simmer for 15-20 minutes, until the potatoes have softened to your preference. While the chili simmers, chop the corn tortilla into a small dice, then add that to the pot, and stir well. It will eventually melt into everything and disappear on you. Chop your toppings while the chili continues to simmer.
Once potatoes are softened, spoon into bowls, and let each person top theirs according to their preference. Enjoy!
Suggested toppings:
green onion, avocado, lime, cilantro, grated cheddar, sour cream or plain yogurt, corn chips (find Juanitos at Smiths or Reams if you're in Utah! perfect tortilla chip)
Subscribe to:
Posts (Atom)