Sunday, September 14, 2014

Rosemary Lime Cornbread

We're talking about cornbread today!  I made a delicious vat of pulled pork; a vinegary sweet mix of pork that both Husband and I thoroughly enjoyed.  The pulled pork recipe I used came from the Food Network website, and I've pinned it for constant future use.  I thought about making some homemade wheat buns to make pork sandwiches, but inspiration struck and I needed cornbread.


After searching Pinterest for all my past cornbread pins, I found two recipes, one by Deb at Smitten Kitchen, and one by Joy the Baker.  I hemmed and hawed and vacillated between the two, and then threw the decision out the window and combined both.  The only way to do things.  I hate decisions. 


The best thing about Joy's recipe is the genius move of rubbing herbs and zest into sugar to create a crazy flavorful base that makes this cornbread something really different.  You can see what looks like some weird green situation above... That's the sugar and zest and rosemary.  The smell is killer.


The best thing about Deb's recipe is that it has a base of sour cream (or Greek yogurt in my recipe) that cuts a lot of the fat, but keeps a delicious moisture and tang.  Plus, I love the spicy kick from the aleppo pepper.  Because I don't have aleppo, I used a small pinch of cayenne.  I also used one of my most favorite recent food acquisitions, Mike's Hot Honey.  This stuff is amazing; spicy sweet goodness.  I got my bottle from Mountain Town Olive Oil here in Salt Lake, but you can order it online, too. If you don't have any hot honey, just add an extra pinch or two of cayenne plus a couple teaspoons of honey added with the regular one tablespoon called for below.


The last crazy thing I did was to use a touch of carrot juice and lime juice.  I don't know that they actually make that much of a difference, so if you don't have one or the other of these, you can just nix them both and up the milk to 1/3 cup.  I like to think, though, that the juices add just a touch extra zip (lime) and sweetness (carrot) that round the flavor out.


Rosemary Lime Cornbread
Yield 1 9x5 pan, about 8-12 servings
Inspired via here and here

2 Tbs. sugar
1 tsp. lime zest
1 Tbs. fresh rosemary, chopped
1 c. flour
1 c. cornmeal
2 tsp. baking powder
1/2 tsp. salt
pinch cayenne
1 egg
1 c. plain greek yogurt
1/4 c. milk
1 Tbs. carrot juice
1 tsp. lime juice
1 Tbs. honey
2 tsp. hot honey
2 Tbs. olive oil
optional: almonds for decorating

Preheat oven to 400 degrees F.  Grease a 9x5 loaf pan, a muffin pan, or any variation of smaller pans (I used a round 6" cake pan and a mini loaf pan.)

Combine the sugar, zest, and rosemary in a large bowl, and rub it together with your fingers to release the yummy oils into the sugar.  Add the remaining dry ingredients (flour, cornmeal, baking powder, salt, and cayenne) and whisk to fully mix.

In a small bowl, combine all wet ingredients (egg, yogurt, milk, juices, honeys, and oil) and whisk thoroughly to remove the majority of lumps.  Pour wet ingredients into dry ingredients, and mix just to incorporate fully.

Pour batter into prepared pan(s) and, if using, place almonds in a decorative pattern on top of the batter.  I used rosemary marcona almonds from Trader Joe's.  Bake until just turning golden on top, and a toothpick inserted into the center comes out clean, about 20-25 minutes for a loaf or cake pan.


This stuff is amazing smothered with butter and honey, but promise me you'll take a bite of it plain and warm.  Major flavor explosion.

Tuesday, June 17, 2014

Stuffed Chicken and Pasta

It's been a while since I've photographed my homemade recipe efforts, so I hope you'll excuse that I ended up with one good photo that I'm willing to share.  Turns out photographs of fresh whole wheat pasta are not all that appetizing.

But to the recipe!  I've been doing my best to shove vegetables into every meal I can, and kale has become a recent favorite.  It's so versatile, and with my allergy to spinach, it's the best green I can think of to use in basically any recipe.  Also, cheese.  Lots of cheese goes into this chicken.

This stuffed chicken method is really a jumping off point for so many variations.  I used the ingredients I had on hand, but feel free to use a different green (chard, spinach, mustard, arugula), or a different base veggie (onion, broccoli, potato, zucchini...), and so many different kinds of cheese (swiss, mozzarella, ricotta, brie if you're fancy, even cottage).

As for the pasta, the method I'm using below is a very shortcut-y riff on the classic cheese sauce method.  I love weeknight shortcuts.  And to take even more shortcuts, feel free to use a marinara sauce if you already have one on hand!


Kale and Red Pepper Stuffed Chicken Rolls
Serves 2-4

For the chicken:
2 chicken breasts
Salt and pepper
1/2 red bell pepper
Pinch onion powder
4-5 leaves kale
1 clove garlic, minced
1 oz cream cheese
2 Tbs. plain yogurt
1 oz goat cheese
1/4 c. shredded cheddar
2 green onions, chopped
2 Tbs. almond meal
1 Tbs. wheat flour
Pinch garlic powder

For thick chicken breasts, cut in half horizontally to create two thinner filets of chicken.  For thinner chicken breasts, no cutting is necessary.  Cover the chicken with plastic wrap and pound out the chicken with a mallet, or use the heel of your hand, to get the chicken to a mostly even 1/2 inch thickness. Season both sides with salt and pepper.  Set aside.

Preheat oven to 350 degrees. Grease a baking dish that will fit your chicken (I used a glass 9x5 bread pan).

Heat a large non-stick skillet over medium heat.  Chop the red bell pepper into small (1/8 to 1/4 inch) dice.  Add a small glug of fat (olive oil, butter, coconut oil, vegetable oil) to your skillet, and toss in your chopped pepper.  Add salt, pepper, and pinch of onion powder, and saute.  While the bell pepper cooks, remove kale off the thick stem, and chop small.  When bell pepper is getting soft (about 3-5 minutes), add kale and garlic.  Saute for a couple of minutes, then turn heat to low for the kale to continue to wilt.

In a small bowl, combine cream cheese and yogurt, and mix with a fork to mostly combine (it's okay if it's still a little chunky).  Add goat cheese, cheddar, and green onion, and mix together with a fork.
Note: you can really use any cheese/yogurt/milk combination.  You want some soft cheeses like cream cheese, ricotta, etc. in order to give things a creamy consistency, but use whatever you have on hand.
Add the kale and pepper mix to the cheeses, and use a fork to combine.  Or just get you hands in there to make sure everything is incorporated well.  Taste and season with more salt and pepper if desired.

Combine almond meal (or 2 Tbs. almonds, chopped as small as possible), wheat flour, and garlic powder in a bowl.  Add some salt and pepper if you like.

To assemble, lay chicken breasts out flat.  Add a dollop of the kale and cheese mixture to the center.  Roll the chicken around it, and place the chicken, seam side down, in your prepared baking dish. Repeat with remaining chicken breasts.  Sprinkle almond mixture over top to cover chicken.  Spray tops of chicken with olive oil or cooking spray.  Bake in oven for 30-35 minutes, or until cooked through.

Serve chicken with a side of creamy pasta and marinara for dipping.


Creamy Pasta and Quick Marinara
2 on-the-vine tomatoes
1 clove garlic, minced
1/4 tsp dried basil
1 Tbs. ketchup

4-8 oz pasta
2 Tbs. plain yogurt
1 Tbs. cream
1/4 c. grated Parmesan cheese
Fresh cracked pepper

For the marinara:  Chop the tomatoes into rough quarters or eights, then process in a blender until mostly smooth (if you like a chunky marinara, stop the blender early to ensure chunks).  Alternately, hand chop the tomatoes very small.  Pour tomatoes (and any juices on the cutting board) into a skillet (feel free to use the same skillet from the peppers and kale above!) over medium low heat.  Add garlic, basil, and ketchup.  Allow to bubble away until all other meal components are ready, but at least 10 minutes.  Add salt and pepper to taste.
Note:  Ketchup is used to thicken things just a bit and add a touch of sweetness.  Feel free to skip on that and add a small bit of honey or brown sugar.  Or a teaspoon or two of tomato paste would work.

For the pasta:  Bring a pot of water to a boil and salt generously.  Add pasta, and cook to al dente.  Drain the majority of water off, being sure to leave just a bit in the pot (a few Tbs. up to 1/4 c.)  Add yogurt, cream, cheese, and pepper, and stir over a medium heat until everything is combined and creamy, adding salt to taste.

Friday, June 6, 2014

Friday Favorites

Hey everyone! Lacy here, starting off some Friday favorites for this week. It's Friday, it's nice out, and Brian and I have plans to get Chinese food tonight, so I'm pretty happy about life in general. This time of year just really gets me in all those happy brain places. (there may be some help from pregnancy hormones this time around, but who can say for sure.) Here's some things I'm excited about this week!

Pregnancy has messed with my taste buds in that I rarely crave chocolate anymore. There's a bag of chocolate chips in my cupboard that I'm sure is suffering from severe abandonment issues. However, I do want all the citrus and lemon things, so this pie is especially appealing to me. Especially since it has an easy graham cracker crust.


I go through phases of being very interested and very not interested in cross stitch. It usually comes down to the thread in my current project being tangled, and me being too lazy to rethread it. I just started this pattern for baby girls nursery and I have high hopes of actually finishing it. (Additionally, since I spend a lot of time watching TV after work, this makes me feel like I'm sort of getting something done...)

Maternity overalls are a thing I want? They're proving pretty hard to track down (this pair from H&M is sold out) and I'm thinking that's the universe's way of saying "Lacy, do not squeeze your pregnant self into a pair of overalls. Really. Don't."

 The caption for this picture on Pinterest was "Cat ran out of toner". Even disregarding my love for grey cats, that was enough for me to love this shot.

Headbands! Summer! They go hand in hand. And thusly, I want to make this one.
Happy National Donut Day! I ate two in a row and followed it up with a donut hole. (Unrelated - wish me luck on my gestational diabetes test next month!)
.......................................

Hey hey!  Ashley here, and I'm pretty happy about my Friday despite no one at work getting my Rolling Stones reference earlier today.  Harrumph.  Also despite my lingering nausea after suffering a bout of stomach flu (or gastroenteritis, if you're medically inclined.) Still, it's a good day.  And I get to spend my next few days prepping to make someone a wedding cake!  (I'm terrified.)

First up, rooms I'm interested in for reasons unknown to myself.

I scrolled past these photos in Apartment Therapy's feed, and on each of them, I had to scroll back up and take a second and third look.  I love the bright pops of lime (chartreuse?) green in the top photo.  So eye catching!
And maybe it's just the composition of the second photo?  But something about all the straight lines in this photo... the walls, the couch, the books and book ends... I can't stop staring.


 Solidifying herself as the coolest person I'll never meet, it turns out Audrey Hepburn had a pet deer.  I want that life.

Anthology Mag continues to post the prettiest things ever.  I have no place for these hexagonal... things.  And no use for them.  And yet... Love.

 The Line Shape Colour blog has quickly become my favorite wanderlust website.  The photos are gorgeous and completely capture the moment.  It's like I'm actually there. Sigh... this is in Kathmandu, a place I never knew I needed to go to.  Until now.


This is a photo of the "Marveilleuses" of Paris in 1908.  I just... why can't we dress like this anymore?  I mean, even back then it was considered overly decadent.  But still, I'd like to have a reason to put on a hat five times the size of my head that renders the umbrella I'm carrying completely unnecessary, but I would carry that umbrella anyway because, dang it, fashion.


And a treat for your weekend!  This sparkling cherry lemonade is going to be made the moment Lacy's pool welcomes us for a pool party.


Happy Friday, friends!  Go out and do something summery!


Tuesday, June 3, 2014

Impress Press On Nails: A Review by Lacy

I've tried fake nails exactly once. It was in middle school, during a sleepover. They were sooo long and made it basically impossible to deal with my contacts. I had ripped them all off by the next day because they were so irritating. I'm not sure why I decided I NEEDED to try these fake nails out, when I've had so little experience with this genre of nail care. But...I did. And here's a review for you!

The Impress Nails come in this cute bottle, and each set comes with 24 nails. (So if you can get the sizes to work out, you could get two full manicures out of this. You can probably do that math yourself, I just thought I'd point it out.)

I don't know if these necessarily take less time than just painting your nails. But I also spent a lot of time picking the sizes, and I applied them fairly slowly in an effort to get them aligned properly and all that business. Here's what they looked like before I did any filing.


I really liked the shape of these, and the fact that the standard size is considerably shorter than most fake nails I've seen. (They do offer some in longer lengths, if that's your thing.)

It also took me a little bit to get them filed down, but that's probably because my nail file is pretty crappy. I'm wondering if a metal file would be more effective than the emery board I was attempting?


The top picture is my nails after they were filed. To compare, the second photo is my actual nails, after I did a particularly good job painting them. (and yes, I'm weirdly wearing the same pants in both pictures. Considering these pictures are a good year apart, and I rarely wear those jeans, it's pretty weird.) I liked how it was relatively easy to get the fake nails to look like the shape of my actual nails. If you have really round nails naturally, you would probably  have to put a bit more effort into filing them. (assuming you even wanted them round or shorter.)

My overall grade is an A! These nails stayed on a full week (and honestly could have stayed on longer if I hadn't realized the edge of ONE nail was loose and instantly decided I needed to peel them all off). They didn't bug me like I expected, and I really loved having nice looking hands for a whole week. (I don't know about you, but my nail polish usually chips in the first couple days. And I'm too lazy to redo it for at least a week. Sometimes two...) They didn't leave any residue on my nails, and besides being a little dry, my nails seemed no worse for wear after the removal.

You can find these at Target or Walgreens. At least in Murray, Walgreens seemed to have a better selection. You can also buy them online here or here. If any of you try these out, let me know if you liked them!

Saturday, May 24, 2014

Daily Makeup Routine

Lacy showed you her favorite beauty picks, and I, of course, wanted to tag along.  I'm showing you my makeup routine!  This is pretty much what I do with my face on a daily basis.  I like a pretty light coverage, partly because I don't like not being able to touch my face or my eyes throughout the day.  But more importantly, I'm pretty lazy in the makeup department.  I mean, don't get me wrong; I definitely get into those makeup moods where I mess around for an hour trying on different eyeliners, shadows, and lipsticks.  But on a daily basis, I want something easy and light.  Plus, on the days when I do the full thing - the concealer, foundation, eyeliner, mascara, eye shadow, blush, lipstick... - I usually just end up feeling like I look like a 10 year old who just got permission to play in her mother's makeup bag for the first time.

So here goes!


There's the line up.  I can apply all these products in about five minutes or less, which is basically my ideal way to go with makeup.  A quick getting-ready routine means I have more time to make my breakfast and lunch, and maybe even get some reading time in.

Firstly, concealer.


I used to use a concealer stick that is so old that any kind of branding on the package has completely worn off.  Which obviously means that I didn't use it that often.  This bottle of Almay smart shade concealer in light/pale probably won't last me as long because I've begun to use it daily!  I picked this up after getting a Target coupon for $4 off.  Otherwise, I'd never pick up something I'd consider so pricey (It's only $7.50, I'm just a cheapskate.)  I only need a tiny dot of product (see photo above) to cover any and all blemishes.  The product blends in flawlessly, and I can't even feel it on my skin.  And the coverage is excellent!  I'm in love.

Next up, foundation.


But... not really foundation.  I can't handle heavy things on my skin, so tinted moisturizer is basically heaven for me.  I use a small dot of L'Oreal BB Cream with a half pump of L'Oreal Magic Lumi Primer, mix it a bit with my fingertips, and smooth it all over my face, concentrating mostly across my cheeks and T-zone.  The Lumi primer gives a faint but really pretty shimmer, and the BB cream gives a smooth finish.  I used to just quickly tap my face with powder, but this takes basically the same amount of time with a much longer-lasting and prettier coverage.

Once the overall face is taken care of, I focus on eyes.


I'm a black liner and mascara kind of girl.  I've tried brown before, and I always feel like it doesn't pop enough and fades quickly (although, the fading thing could have more to do with the cheap liners I'm using.)  I love the Sephora nano eyeliner.  It goes on smoothly and doesn't fade off throughout the day. I just line the outer corners of my eyes on both top and bottom.  I'm not sure when I started doing this, or why, but it's become a bit of a habit now.  This method means that I don't end up with liner in my creases by the middle of the day.  Win.

For mascara, I've used the classic green-and-pink-tube Covergirl mascara for as long as I've been wearing makeup.  However, I got roped into a Mary Kay party, and won a tube of their Lash Love mascara.  And I've kind of fallen head over heels for it.  This sample tube is nearly gone, and I need to locate a new tube asap.  The mascara goes on thick without being clumpy, separates my eyelashes beautifully, and wears well throughout the day.  My only complaint is that, by the end of the day, I have noticed a bit of flaking.  It also doesn't wash off quite as well as my Covergirl standby.  Those complaints are pretty minor, though.  In the below photo, you may notice that I only have mascara on my top lashes.  This is another thing I do because I'm a bit lazy.  But I also think that it gives my eyes a more open look.  And bonus, I don't end up with black smears under my eyes when I start to get tired at the end of the day!

Once the eyes are done, it's time for a bit of blush.


I scheduled a Nordstrom counter make-up date with my Little Sister Ariel, and of course, they tell you you have to spend $50 in makeup when that's done.  This NARS 'The Multiple' stick was one of the things they used on me, and I ended up loving, so it was a bit of a splurge.  This shade is Portofino.  I use it strictly for my cheeks, but it can be used as shadow and lipstick as well.  It has a nice soft shimmer that I really like.  I put a few dabs onto my cheekbones, and use my fingers to smudge/smooth it out.

And that's it!  My typical beauty routine.  The whole thing will take you less time to do than it has taken you to read this post (sorry about that...)  I tend to shop the cheap makeup aisles (E.L.F., N.Y.C., and Wet n' Wild, anyone?), but in writing this post, I've discovered that all my actual favorites are... not those brands.  So, it turns out it quality is better than a cheap price tag in the long run.  Who knew?

Here's the finished look:


I just smear on one of about a million lipsticks, balms, or glosses I have floating around my purse and house; whichever one I'm in the mood for that day.  Pretty much any color works with this minimalist look!  The one I've got on above is Fiore by Borghese (a sample I got through a Beauty Bar subscription nearly two years ago.)  It's much darker in person than it is in that link picture, by the way.  And it's super long lasting and a great natural color, but, warning, also a bit sticky.

Done!  Now it's your turn.  Share your beauty favorites or beauty routine!  Even if I'm not a huge makeup person, I still love to read other people's routines.  Weird.

Wednesday, May 14, 2014

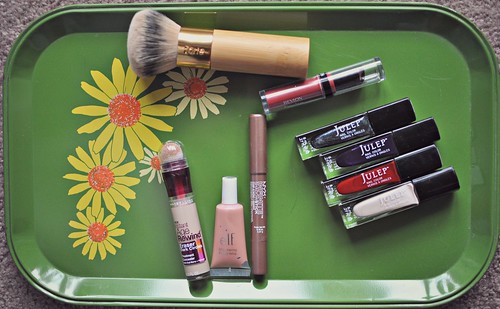
New Makeup Favorites

DSC_0013ed
 
Hello! I know our blog has been dying a slow tragic death. But I'm reviving it because...I want to talk about makeup. Cool?

I weirdly love watching makeup vloggers and lusting over all the pretty things at Sephora. However, my makeup budget puts me squarely in Ulta land. (The cheap side, guys. Not the fancy side.) So the good news is that any makeup stuff I post is likely going to be quite affordable. The bad news is that I'll never be able to do a Sephora haul post. So...sorry if that was what you were hoping for. 
 
On to the things!
 
DSC_0022ed
 
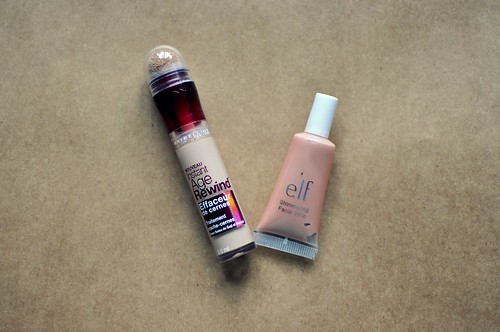
I haven't ventured too far into the world of undereye concealer, but I decided to try out the Maybelline Instant Age Rewind after Essiebutton recommended it. (She's one of the aforementioned beauty vloggers I really enjoy.) This stuff goes on really creamy and doesn't dry or cake throughout the day. They sell a version of this specifically for spot coverage too. But in the interest of full disclosure, I'll tell you that I use this for both and it does the job. Done and done.
 
(If you're in the market for a fancier undereye concealer, I got a sample of Benefit's Fakeup in a Birchbox and it was great! I feel like it gave a bit more coverage than the Maybelline.)
 
I picked up this Elf Shimmering Facial Whip on a whim one day. Crap, it's pretty. I use it on my cheekbones and it's so shimmery and glowy and it only costs a DOLLAR. Just...buy it. You can't lose. (I've heard this is a pretty good dupe for Benefit's High Beam, but having not tried that, I can't say for sure)
 
DSC_0018ed
 
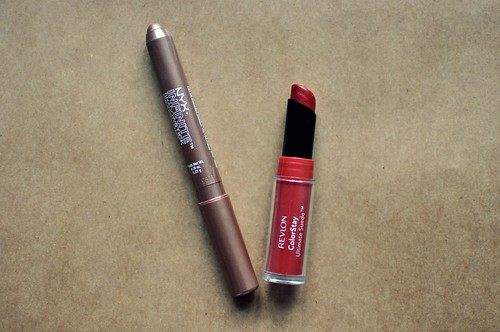
I am really loving NYX products lately. Their lipglosses and blush are great and I'm intrigued by their lipsticks and eyeliners. I'll try to keep you posted on developments in that area. But! All I need in my life right now is this Infinite Shadow Stick. I have maybe the world's most oily eyelids, so if I don't use a primer (a good one) my eyeshadow is MIA by 10 am. (Well, it's not really missing. It has all relocated to my crease.) I'm generally too lazy/late in the morning to bother with  primer and eyeshadow so I just stick to eyeliner. Enter the shadow stick. I draw this thing on my eyelid in the morning and it does NOT budge. Is it a miracle of science? Black magic? I don't know or care. I just know I want more of them.
 
Speaking of not budging, the Revlon Colorstay Ultimate Suede lipstick is another wonder product. This stuff lasts all day. I have seriously had to scrub it off before bed. It's some kind of lipstick/stain hybrid but it doesn't settle into my lip creases or feather out at the edges. If you're a lipstick wearer, seriously give this a try. It will change your life.
 

DSC_0016ed
 
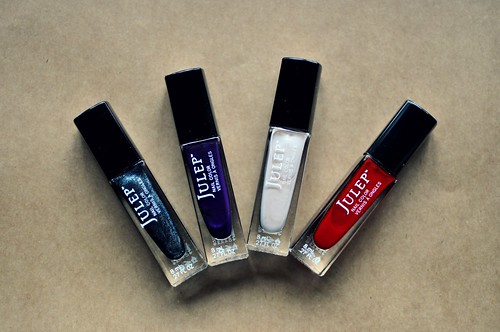
Julep! How loudly can I sing your praises? This is my favorite nail polish ever EVER. The formula goes on perfectly and it lasts seemingly forever. The downside is that it costs more than OPI and you get about half the amount of product. If you're cool spending 20 bucks a month on nail polish (the first month is free!) consider subscribing to Julep. And maybe invite me over to do manicures sometime....
 
 
DSC_0023ed
 
I have saved my very very favorite for last. I have been lusting over the Tarte Foundation Brush and Amazonian Clay Foundation for a while, and Brian got them for me as a Mother's Day present! (are you allowed to celebrate that holiday if your baby just hangs out in your uterus all day? ....should I not say uterus on this blog?) 
 
Moving on. Gah. This brush is so pretty and makes your foundation look flawless. I will say that if you're not into full coverage foundation, the Amazonian Clay probably isn't for you. I totally am though, and I love how it covers my scary pregnancy acne and keeps my skin tone even all the day long. (The first day I used it, I was checking it every couple hours and kept exclaiming to Brian, "my skin still looks so good!"). These items are obviously a bit higher of a price point than my normal makeup, but I do feel like they're a good investment if you want a nice foundation and/or brush. Also, based on how long I've been using just the tiny sample of foundation I got originally from Sephora, the full size is going to last me foreeeever.
 
This has been Lacy going on forever about makeup. Over and out!
 

Saturday, October 5, 2013

Gingerbread Banana Granola Muffins

I should definitely be posting a recipe that's a bit more autumn-like.  I have, after all, made pumpkin donuts and cranberry-orange donuts, which are both fall to winter inspired flavors (I just got a donut pan!  So I'm going a bit crazy with that.)  Autumn is also my favorite time of the year.  I nearly cried of happiness the other day, simply walking down the street seeing pumpkins and crisp leaves and feeling the bite of cool air on my cheeks.  As I said on Instagram, autumn is the real most wonderful time of the year.


But gingerbread is kind of wintery, so let's just pretend I'm ahead of the curve here.  This recipe was a creation born out of the fact that I was actually craving the delicious looking sweet potato granola muffins over on Baker by Nature.  However, the wilting bananas on our little produce shelf were demanding use!  I was going to just do a straight change out of banana mush to sweet potato mush in her recipe, but... I can never leave well enough alone.  So I found Framed Cooks gingerbread muffin recipe, and based the rest off that.


These babies are fluffy and not overly sweet.  The granola gives the muffins a nice textural element, which I cannot live without.   I had the leftovers of a batch of banana granola which was a nice boost of banana flavor as well.   However, feel free to use whatever kind of granola you have lying around or find in the store.  Or throw in a handful of nuts or oats!  Or go completely without.  This recipe likes to be mixed up to your preferences.


Oh, and I skipped the browned butter step.  Not really because I'm lazy, but moreso because I find that putting browned butter into baked goods kind of masks it's incredible flavor.  Unless you're using it as a finisher or in a glaze, I can't really see the point of muting the flavor within your baked good.  That stuff needs to shine!  But.  Maybe you feel differently.  Brown your butter if you'd like!


Gingerbread Banana Granola Muffins
Yields 12+ Muffins
Inspired via here and here

2 1/3 c. all purpose flour
2 tsp. baking powder
1 tsp. baking soda
1 tsp. ground ginger
1/2 tsp. cinnamon
1/2 tsp. allspice
1/4 tsp. cloves
1/4 tsp. salt
3 Tbs. butter, room temperature
1/2 c. sugar
1/4 c. brown sugar
1 c. mashed banana
1/3 c. molasses, full flavored
2 eggs
1/2 c. buttermilk*
3/4 c.+ granola

Preheat oven to 350 degrees.  Spray a 12-cup muffin tin with non-stick spray.  I also have a 12-cup mini muffin tin, and had enough batter to fill up both.

Measure the flour, baking powder, baking soda, spices, and salt into a medium measuring bowl.  Mix with a fork or whisk to combine.

In another measuring bowl, cream together the butter and sugars.  Add in the mashed banana, and mix thoroughly.  Stir in the molasses, then the eggs, one at a time.  Lastly, add the buttermilk, mixing all until fully combined.  Pour a third of this banana mixture into the dry ingredients, mixing with a fork until soaked into the flour.  Add another third and mix, and the last third, mixing until the batter is smooth and no flour streaks remain.  Try not to overmix.  Pour the granola into the batter, and use a rubber spatula to mix the granola in fully.

Spoon the batter into your prepared muffin tins.  Sprinkle a little extra granola on the tops if you'd like!  Put them in the oven, and cook until the tops bounce back when poked and a toothpick comes out clean, about 25 minutes (or around 15 for the mini muffins.) 


*A few tricks if you don't have buttermilk.  Put 1 Tbs. plain yogurt in a measuring cup, and fill it the rest of the way with regular milk.  Mix with a fork, and there's your buttermilk!  You can also mix a bit of milk and lemon juice (maybe a couple teaspoons) and let that sit for 10 minutes or so to sour.  Or just use regular milk. It won't kill your muffins.